Registering and enrolling identities with a CA
Audience: organization administrators, node administrators
If you’ve read our topics on identity and Membership Service Provider (MSP) you’re aware that in Hyperledger Fabric, Certificate Authorities are used to generate the identities assigned to admins, nodes, and users (client applications). While any Certificate Authority that can generate x.509 certificates can be used to create the public/private key pair that constitutes an identity, the Fabric CA can additionally generate the local and organizational MSP folder structures that are required by Hyperledger Fabric.
In this topic, we’ll show a “happy path” for using the Fabric CA to generate identities and MSPs. Note that you do not have to use the Fabric CA to register and enroll identities. However, if you use a different CA, you will need to create the relevant identities and MSPs that Fabric uses to build organizations, client identities, and nodes. We will show examples of those MSPs below.
Overview of registration and enrollment
While it is possible for the admin of a CA to create an identity and give the public/private key pair to a user out of band, this process would give the CA admin access to the private key of every user. Such an arrangement violates basic security procedures regarding the security of private keys, which should not be exposed for any reason.
As a result, CA admins register users, a process in which the CA admin gives an enroll ID and secret (these are similar to a username and password) to an identity and assigns it a role and any required attributes. The CA admin then gives this enroll ID and secret to the ultimate user of the identity. The user can then execute a Fabric CA client enroll command using this enroll ID and secret, returning the public/private key pair containing the role and attributes assigned by the CA admin.
This process preserves both the integrity of the CA (because only CA admins can register users and assign roles and affiliations) and private keys (since only the user of an identity will have access to them).
While admin identities only need to be registered and enrolled with an “organization CA” that generates identity certificates for both admins and nodes alike, nodes must also be registered and enrolled with a TLS CA. This will create a public/private TLS key pair that nodes use to sign and encrypt their communications. If the TLS CA has been created only using a “TLS” profile, the commands to register and enroll an identity with the organization CA are identical to those to register and enroll with the TLS CA. If you are using a CA that contains both profiles, you will have to specify the TLS profile when communicating with the CA. For more information about creating a CA that can only function as a TLS CA, check out the CA deployment guide.
Before you begin
In this tutorial, we will assume that a CA server has been configured and set up using the CA setup instructions. We will also show both the commands and variables used when registering an identity (a task handled by a CA admin or an identity with CA registrar rights), and when “enrolling” an identity (a task handled by the user of the identity).
In either case, the fabric-ca-client must be set up, as it is used to make calls to the CA server where an identity is registered and enrolled. If you are operating in a production environment, you should have TLS enabled, and will need to provide TLS certificates to secure your communications with the CA. The TLS certificates will need to come from the TLS CA you spin up alongside the “organization” CA you use to generate identities for nodes, admins, and clients, and this TLS CA is the same CA you will use to generate certificates (since nodes use TLS to communicate with each other).
Decide on the structure of your folders and certificates
Whether you are running in a test or production environment, it is critically important that you maintain a consistent and coherent structure for managing your folders and certificates. While it is not a strict Fabric necessity to use the same patterns everywhere (as long as your paths are correct whenever you reference them, for example when bootstrapping a node, Fabric can consume them), certificate pathing errors are among the most common errors faced by Fabric users. Forethought and consistency can dramatically reduce these issues.
Note that production deployments might include structures we won’t show here. For example, it might include a folder for gateways, allowing an admin to easily see which organizations and nodes and clients are associated with each network. Similarly, you might see a smart contracts folder containing the smart contracts associated with a network.
The method for organizing your folders and certificates we describe here is not mandatory, but you will find it helpful, as it is consistent with the rest of this topic as well as with the CA deployment guide. Most importantly, it organizes your structures around the organization that owns and manages them. While it might be natural to think of your deployments as being organized around physical structures like peers and ordering nodes, it is actually the organization that is the centralizing figure. Especially since not all network participants will necessarily own a node.
The structures and methods presented here also represent best practices, preventing cases where, for example, Fabric expects an MSP folder to be called msp and, if a different name is used, the name of the folder will have to be changed in the relevant YAML file.
Folder structure for operating the Fabric CA client
While a consistent structure is important for the certificates you will get back from a CA (which you will use when creating nodes and acting as an admin), it is also important for those who will be using a single Fabric CA client to connect to multiple CAs as an admin. This is because unlike organization admins, in which a single identity can be used as the admin of as many nodes as you need, each CA necessarily has a separate admin that is registered when it is bootstrapped and later enrolled.
This is why if you are connecting to different CA servers as an admin from the same CA client, when you use the --mspdir flag, you also must include the -u flag to target the correct CA server. This will allow you to specify the correct CA admin credentials for the CA you are connecting to.
If you will only be using a single CA client to target a single CA server (which will more often be the case for users who will be admins of organizations or nodes), you have the option of specifying the CA server in the YAML file of the CA client.
If you’ve followed the process described in the CA deployment guide, you should have a set of folders associated with your Fabric CA client that look similar to the following:
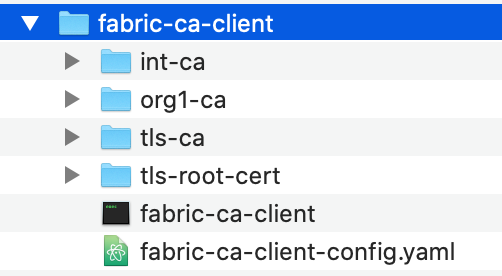
The figure above shows the structure of folders associated with using a single Fabric CA client to connect to multiple CA servers.
As you can see, each CA server has a separate folder underneath the fabric-ca-client folder. Inside each of these CA folders is an msp folder that contains the public/private key pair for the identity of the admin of that CA. This is the --mspdir you must specify when administrating the CA (for example, when registering an identity).
If you are not a CA admin, but rather have a Fabric CA client only for the purpose of enrolling with an organization CA and a TLS CA, it is still a best practice to use a single Fabric CA client. This CA client will still need TLS certificates (which can be obtained using the process described in the CA deployment guide), but you will not need to point to CA admin certificates since you are not acting as a CA admin. Instead, the enroll ID and secret given to you by the CA admin that registered the identity allows you to interact with a particular CA server and receive the necessary certificates.
Folder structure for your org and node admin identities
While the way you organize the folders of the CAs you operate using the Fabric CA client is determined in large part by the multiple CAs a typical CA admin will interact with, the organizational method you use to organize your organization MSPs will be determined in part by how many organizations you anticipate creating and administering.
For example, in the Fabric test network, both peer organizations and orderer organizations are created. As a result, the scripts associated with the network create a folder called organizations, which contains an ordererOrganization and a peerOrganization folder. Each of these folders contains a folder for each organization, which contains both an MSP for that organization and a folder for each node owned by those organizations.
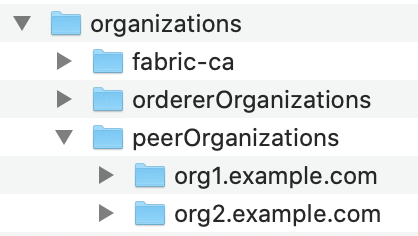
The figure above shows the structure of the organizations managed by an administrator.
Even if you don’t plan to create an orderer organization, this kind of structure provides the highest level of long term flexibility for your deployment. If you create a new peer, for example, you will know to create a folder at organizations/<name of org>/<name of new peer>. This <name of new peer> folder will be the location for the local MSP of the peer (generated when the peer identity is enrolled) and for the certificates generated through enrollment with the TLS CA. Similarly, the location of the MSP of the organization the peer belongs to can reference the msp folder of the organization (which includes both the config.yaml file if Node OUs are being used as well as the public certificate of the admin of the organization, which in many cases will be the admin of the peer).
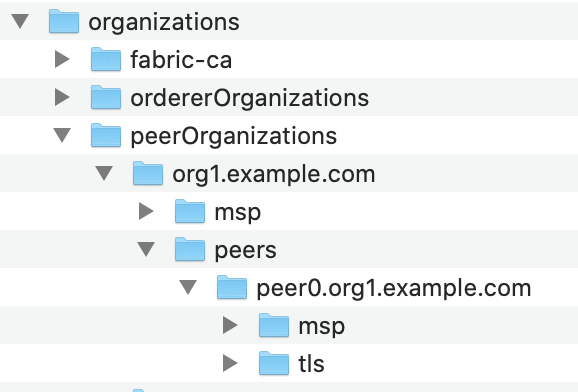
The figure above shows the subfolders inside of a peer owned by the organization. Note the msp folder here under the peers folder. This is the local MSP of the peer, not a duplicate of the org1.example.com MSP.
It is the best practice to create these folders before enrolling identities and then referencing them when issuing the enroll command through the --mspdir flag. Note that while the –mspdir flag is used to specify where the MSP of the CA admin is during registration, it is used instead during enrollment to specify the location on the filesystem where the folders and certificates returned by the CA will be stored.
NodeOUs
In previous versions of Fabric, identities only had two types: client and peer. The peer type was used for both peers and ordering nodes, while the client type was used for both clients (applications) and admins, with the placement of a client type in a special admincerts folder making the identity an admin within a particular context.
Now it is possible, and recommended, to encode not just peer or client, but also orderer or admin roles into the certificates generated by a CA using NodeOUs. This embeds the role an identity has within the certificate.
Note that an identity can only have one of these roles, and that to enable these roles you must copy the relevant stanzas into a file called config.yaml. This config.yaml file is used by Fabric in different ways. In a channel MSP, it is used to verify that the admin of an organization has a role of admin (this replaces the use of an admincerts folder which was used in older versions of Fabric). In the local MSP of a node, it is used to verify the admin role of the node admin and the peer or orderer role of the node itself.
Note that you can name this msp folder anything you want — msp is the default folder name used by the Fabric CA client. If you choose another name, for example, org1msp, then you will have to reference this folder using the --mspdir flag when enrolling the identity. Programmatically, you can use a command similar to this to copy config.yaml to the correct msp folder for the identity you’ve enrolled.
echo 'NodeOUs:
 Enable: true
 ClientOUIdentifier:
   Certificate: cacerts/localhost-7054-ca-org1.pem
   OrganizationalUnitIdentifier: client
 PeerOUIdentifier:
   Certificate: cacerts/localhost-7054-ca-org1.pem
   OrganizationalUnitIdentifier: peer
 AdminOUIdentifier:
   Certificate: cacerts/localhost-7054-ca-org1.pem
   OrganizationalUnitIdentifier: admin
 OrdererOUIdentifier:
   Certificate: cacerts/localhost-7054-ca-org1.pem
   OrganizationalUnitIdentifier: orderer' > path to msp>/msp/config.yaml
Or you can manually copy the Node OU material into the config.yaml file for the msp folder:
NodeOUs:
  Enable: true
  ClientOUIdentifier:
    Certificate: cacerts/<root CA cert for this org>.pem
    OrganizationalUnitIdentifier: client
  PeerOUIdentifier:
    Certificate: cacerts/<root CA cert for this org>.pem
    OrganizationalUnitIdentifier: peer
  AdminOUIdentifier:
    Certificate: cacerts/<root CA cert for this org>.pem
    OrganizationalUnitIdentifier: admin
  OrdererOUIdentifier:
    Certificate: cacerts/<root CA cert for this org>.pem
    OrganizationalUnitIdentifier: orderer
In a production scenario, it is assumed that users will be creating only one organization. However, it is a good practice to establish a separate folder structure for this organization and then create a structure underneath this organization for your msp (defining the organization) and your nodes (which will have a local MSP and TLS sections).
If you are creating an orderer, you obviously do not need to copy the PeerOUIdentifier into your config.yaml file (or vice versa), but for the sake of simplicity you might want to use the entire section — extra stanzas do no harm, and they allow the same config.yaml to be used for multiple types of nodes and identities associated with an organization.
Register an identity
While identities that will be used by admins (or other users) and identities used by nodes have different purposes, they are fundamentally all just identities: public/private key pairs in which the public key is known to others and the private key is used to sign, generating an output which can be verified to have come from the private key even though the private key itself is never exposed.
As discussed above, an identity is first registered with a CA by a CA admin. This identity is then enrolled by the user of the identity. If you are using the Fabric CA client, this registration command looks like this (regardless of the type of identity you are enrolling, and the type of CA):
./fabric-ca-client register -d --id.name <ID_NAME> --id.secret <ID_SECRET> -u <CA_URL> --mspdir <CA_ADMIN> --id.type <ID_TYPE> --id.attrs $ID_ATTRIBUTE --tls.certfiles <TLSCERT>
Where the variables are the following:
ID_NAME: The enroll ID of the identity. This name will be given to the user out of band, who will use it when enrolling.ID_SECRET: The secret (similar to a password) for the identity. This secret will also be given along to the user along with the enroll ID to use when enrolling.CA_URL: The URL of the CA, followed by the port7054(unless the default port has been changed).CA_ADMIN: The path to the location of the certificates for the admin of the CA.ID_TYPE: The type (or role) of the identity. There are four possible types:peer,orderer,admin, andclient(used for applications). This type must be linked to the relevant NodeOU. If NodeOUs are not being used, you can ignore the type and--id.typeflag.ID_ATTRIBUTE: Any attributes specified for this identity. For more information about attributes, check out Attribute based access control. These attributes can also be added as a JSON array, therefore the$ID_ATTRIBUTEis not meant to represent a single attribute but any and all attributes, which should be placed in the register command after the--id.attrsflag.TLSCERT: The relative path to your the TLS CA root signed certificate (generated when creating the TLS CA).
Note that the -d flag enables debug mode, which is useful for debugging if the registration fails.
Here is a sample register command for an admin identity:
./fabric-ca-client register -d --id.name org1admin --id.secret org1adminpw -u https://example.com:7054 --mspdir ./org1-ca/msp --id.type admin --tls.certfiles ../tls/tls-ca-cert.pem --csr.hosts 'host1,*.example.com'
After the identity has been successfully registered, the CA admin would give the enroll ID (org1admin) and enroll secret (org1adminpw) to the user who will enroll as an admin.
If you are creating the certificates needed for a node, make sure to register and enroll with the TLS CA associated with the organization as well.
Enroll an identity
Once the enrollment CA has been set up and identities have been registered, the CA admin will need to contact the user who will be enrolling out of band to give them the enroll ID and secret they used when registering the identity. Then, using this ID and secret, the user can enroll the identity using their own copy of the Fabric CA client to contact the relevant CA (which will be either an organization CA, used to create admin and node identities, or a TLS CA, used to generate the TLS certificates that nodes need). Note that if TLS has been enabled, this user will need to acquire the TLS CA root signed cert to include when enrolling.
While it’s possible to enroll a node identity before enrolling an admin, it makes more sense to enroll an admin first and establish your organization’s MSP before enrolling nodes (whether it’s a peer or an ordering node). You certainly need to enroll an admin identity and place its certificate in the local MSP of a node before starting the node.
The command looks like this:
./fabric-ca-client enroll -u https://<ENROLL_ID>:<ENROLL_SECRET><@CA_URL>:<PORT> --mspdir <MSP_FOLDER> --csr.hosts <CSR_HOSTNAME> --tls.certfiles $TLS_CERT
With these variables:
ENROLL_ID: The enroll ID that was specified when registering this identity. This will have to be communicated to the user of this identity out of band.ENROLL_SECRET: The enroll secret that was specified when registering this identity. This will have to be communicated to the user of this identity out of band.CA_URL: The URL of the CA, including the port (which is 7054 by default). If you have configured two CAs at the same location, you will also have to specify a CA name following a--canameflag, but in this tutorial we assume you are using a configuration of CAs as specified in the [CA deployment tutorial].PORT: The port utilized by the CA you are enrolling with.MSP_FOLDER: The path to the MSP (the local MSP, if enrolling a node, or the org MSP, if enrolling an admin) on the filesystem. If you do not specify the-mspdirflag to specify a location, the certificates will be placed in a folder calledmspat your current location (if this folder does not already exist, it will be created).CSR_HOSTNAME: Only relevant to node identities, this will encode the domain name of a node. For example, MagnetoCorp might choose a hostname ofpeer0.mgntoorg.magnetocorp.com.TLS_CERT: The relative path to the TLS CA root signed certificate of the TLS CA associated with this organization.
Here is an example enroll command corresponding to the example register command we used earlier:
./fabric-ca-client enroll -u https://org1admin:org1adminpw@example.com:7054 --mspdir ./org1.example.com/msp --csr.hosts 'org1,*.example.com' --tls.certfiles ../tls/tls-ca-cert.pem
Unlike a typical CA, in which an enrollment command will return only the public/private key pair, the Fabric CA returns a folder structure called an MSP. This MSP can then be used to create a structure that can be consumed by Fabric when creating nodes or adding organizations to a channel. In the case of enrolling an admin, the MSP forms the basis of an organization. In the case of enrolling a node identity, it forms the basis for the local MSP for the node. Note that this folder structure will also be returned by the TLS CA. However, only the relevant TLS certificates are needed.
Here is a sample of the MSP that will be returned after your enroll the identity:
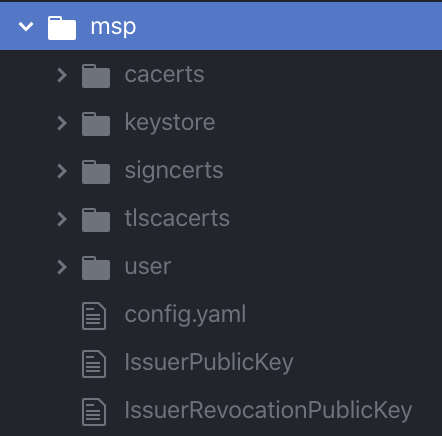
The figure above shows the subfolders returned by an enrollment.
In certificate naming, it is helpful to use a convention that will help you keep track of whether you are referencing a public certificate or a private key. Given that both have the .pem extension, consider the following convention for naming public certs and private keys:
- Rename a public cert from
cert.pem(which is the default name the Fabric CA will give a public cert) to something meaningful. For example, the public cert of an admin of “Org1” could be given a name likeorg1-admin-cert.pem. - Rename a private key from
94u498f9r9fr98t49t345545345_skto something meaningful likeorg1-admin-key.pem.
In this convention, the last word in the name before appending the .pem extension would be either cert or key to help you remember which is which.
Create an MSP from an enrolled identity
As we have noted, enrolling an identity with the Fabric CA generates output that includes not just public/private key pairs, but a number of related folders and certificates that Fabric networks need to consume.
However, that does not mean that these folders can simply be dropped into a channel configuration (to join an org to a channel) or into the local configuration of a node (to create a local MSP). In the case of creating an org MSP that can be added to a channel, you will need to remove the private key of the admin. In the case of a local MSP, you will need to add the public certificate of an admin.
For more information about the folders and certificates that are needed in both an org MSP (also known as a “channel MSP”, since it is added to a channel) and the local MSP of a node, check out MSP structure.
Create the org MSP needed to add an org to a channel
The organizations in a Fabric network don’t exist in a physical sense the way nodes do. Rather, they exist as a structure of folders and certificates on the configuration of a channel. These certificates identify the relevant root CA, intermediate CA (if one was used), TLS CA, and at least one admin identity. As you recall from the membership topic and the registration and enrollment steps above, these folders and certificates are returned by the Fabric CA client when enrolling an admin identity, which is why the act of enrolling an admin and the act of “creating an organization” are closely related.
Here is a sample of the folder structure you need to create when you want to add an organization to a channel (the structure might vary slightly depending on the method you use to add an organization to a channel, but whatever the method, these are the files and folders you will need):
<location of msp>/msp
├── config.yaml
├── cacerts
│   └── cacert.crt
├── intermediatecerts
|   └── cacert.crt
├── tlscacerts
│   └── tlsca.<org-domain>.pem
└── tlsintermediatecerts
    └── tlsca.<org-domain>.pem
Where the folders and certificates are:
cacerts: the root certificate (ca-cert.pem) of the organization CA where the identity of the admin was registered and enrolled.intermediatecerts: the root certificate of an intermediate CA, if one was used.tlscacerts: the root certificate (ca-cert.pem) of the TLS CA that has issued certificates to the nodes associated with this organization.tlsintermediatecerts: the root certificate of the intermediate TLS CA, if one was used.
Note that while the certificates themselves can be named anything you want, you should not change the name of the folders themselves, as Fabric expects to consume folders with certain names.
See NodeOUs for instructions on how to generate the config.yaml file for this organization. In older versions of Fabric, the config.yaml file would not have been here and an additional folder, admincerts, would be needed, in which certificates identifying the admin of this organization would be placed. This is no longer necessary thanks to Node OUs. Any identity given a Node OU of admin by the CA listed in config.yaml can administer the organization.
Create the local MSP of a node
While the MSP of an organization serves as the representation of the organization on a channel configuration, the local MSP of a node is a logical collection of parameters that is used, along with other parameters, as part of the creation of a node.
As has been noted above, nodes must be bootstrapped both with enrollment certificates (the public/private key pair that identifies a node) and the TLS certificates that encrypt the communication layer between nodes. This “bootstrapping” happens by listing the location of these certificates in the relevant YAML configuration file that is referenced when creating the node. This means that the local MSP of a node must be created before the node itself can be created. Note that the enrollment certificates for the node are specified by listing the location of the MSP that contains them, while TLS certificates are identified through the absolute path to the location of each certificate.
For reference, here is a sample peer configuration file.
And here is a sample ordering node configuration file.
Note that these configuration files ask for the location of the relevant local MSP folder. For the peer, this is defined through the mspConfigPath. For the orderer, it is the LocalMSPDir. The folders found in this location will be used to define the local MSP of the node, including the private key the node will use when signing its actions as well as the public key of at least one admin of the node.
The TLS certificates, on the other hand, are defined individually, rather than pointing to a folder, and can be found in the TLS settings section of the YAML. This means that TLS certificates do not need to be kept in a strict folder structure like the local MSP (relevant in particular to users who will be using an external CA to generate TLS certificates — use the sample YAML files as a guide to what these certificates are used for). When you enroll a node with the TLS CA, the generated TLS public key can be found in the /signcerts folder and the TLS private key can be found in the /keystore folder. When you stand up a node that is enabled for TLS, you need to point to these files from the relevant fields in the YAML config file.
As with all of the configuration parameters in the YAML file of a node, you have the option to specify the msp folder and TLS certificate locations either in the YAML itself or through the use of environment variables.
If you are using a containerized solution for running your network (which for obvious reasons is a popular choice), it is a best practice to mount these folders (volumes) external to the container where the node itself is running. This will allow the certificates to be used to create a new node should the node container go down, become corrupted, or is restarted.
For a look at a sample local MSP, check out MSP structure. Note that you will not receive all of these certificates back simply by enrolling a peer identity. You will need, for example, to create the users subfolder and put the public certificate of the identity that will be administering the node in the folder prior to bootstrapping. You will also need an operations certificate (depending on the configuration of your network, this might come from a separate operations CA). For more information about the operations service, check out The Operations Service.
Here is a sample local MSP as it might look when the node has been enrolled and the additional fields have been added:
localmsp
  └── config.yaml
  └── cacerts
      └── <root CA public cert>.pem
  └── intermediatecerts
      └── <intermediate CA public cert>.pem
  └── keystore
      └── <node private cert>.pem
  └── signcerts
      └── <node public cert>.pem
  └── tlscacerts
      └── tlsca.<org-domain>.pem
  └── tlsintermediatecerts
      └── tlsca.<org-domain>.pem
  └── operationscerts
      └── operationcert.pem
Where the folders and certificates are:
cacerts: the root cert of the organization CA where the identity of the admin was registered and enrolled.intermediatecerts: the root cert of an intermediate CA, if one was used.keystore: the private key of the node. This is the key the node uses to sign its communications.signcerts: the public key of the node. This certificate is presented to nodes making incoming communications, allowing the node initiating a communication to know that it is talking to the correct node.tlscacerts: the root cert of the TLS CA that has issued certificates to the CAs or nodes associated with this organization.tlsintermediatecerts: the root cert of the intermediate TLS CA, if one was used.operationscerts: the certificate needed for interaction with the operations service.
Note that while the certificates themselves can be named anything you want, you should not change the name of the folders themselves, as Fabric expects to consume folders with certain names.
Just as Node OUs make it no longer necessary to include a certificate of an admin in the organization MSP, it is not necessary to include the public certificate of a node admin to administer the node. Any identity given a Node OU of admin by the CA listed in config.yaml can administer any of the nodes owned by that organization without needing to place the public certificate of that admin in the organization MSP or the local MSP.